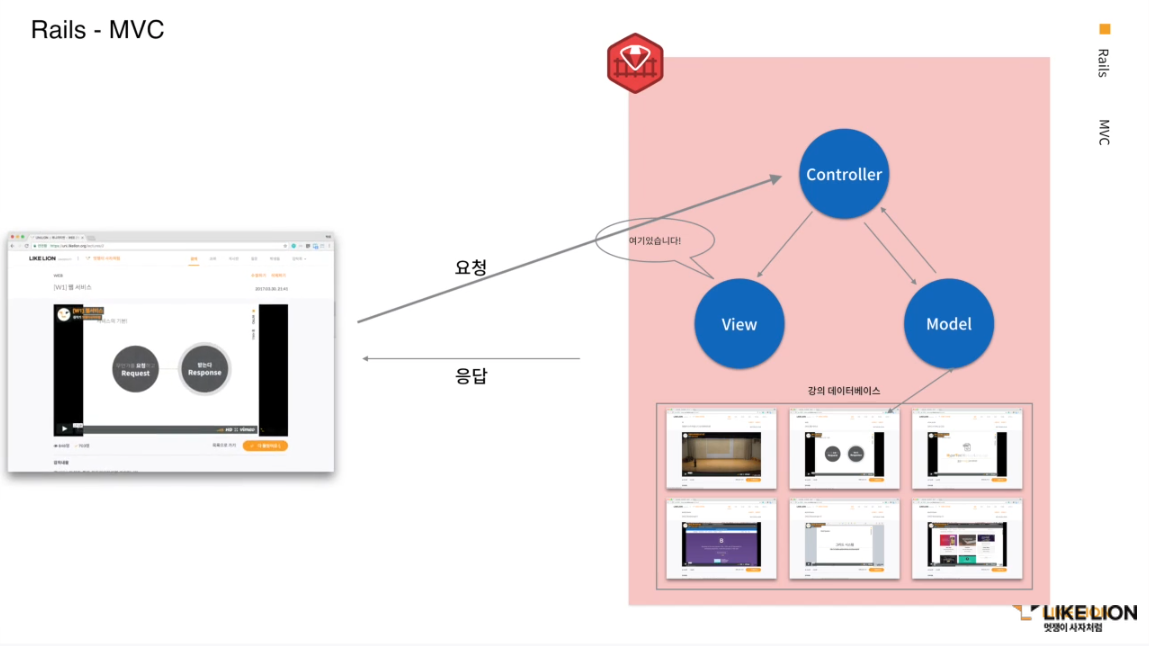
작년 겨울에 장고를 배웠을 때도, 그리고 이번 레일즈를 배울 때도, MVC에 대해서 배웠따. 두 프레임워크 모두 MVC 패턴을 기반으로 하기 때문이다.
이번에는 멋쟁이 사자처럼 중앙강의 내용을 정리봤다.
M V C Model View Controller 데이터를 관리/사용자가 보이는 화면/ 중간 관리자
-
‘멋쟁이사자처럼에서 2번 강의를 보여줘’ 라는 요청이 들어오면 (주소창에서 )
-
controller가 가장 먼저 반응한다 “ 모델아 2번 강의 줘”
-
모델: 이번 강의를 데이터베이스에서 찾아서 가져옴 그리고 컨트롤러에게 넘겨줌
-
그럼 컨트롤러는 다시 view에게 받은 정보를 넘겨주고 view는 사용자에게 응답한다.
Create
erb- 임베디드 - 루비 명령어를 입력할 수 있다.
def index
 @msg = "Hack your Life!"
end
이 @는 이렇게 해야 index html에서 사용할 수 있다는 것이다.
new
controller에 들어가서
def new
#사용자가 데이터를 입력할 화면
# 자동으로 액션 이름과 같은 화면을 불러서 사용자에게 보여줘라
end
그 액션을 실행하기 위해서는
routes.rb에
get '/posts/new' => 'posts#new
이게 있어야 한다.
즉 routes.rb에 써져있는 저 말은 /posts/new라는 입력이 주소창으로 들어왔다. 그러면 우리는 posts#new를 호출할거야 라는 말이다.
posts#new 에서는 자동으로 액션 이름과 같은 화면을 불러서 사용자에게 보여주게 되어 있으니까 이름과 똑같은 new.html.erb가 화면으로 보여지는 것이다.
create
form 태그를 이와 같이 입력한다고 하자
<form>
    <p> 제목 </p>
    <input type="text">
    <p> 내용 </p>
	<input type="text">
</form>
그런데 우리가 보낸게 제목이고 내용인 걸 컴퓨터는 모르잖아. 그래서 name 속성을 붙여주는거다
<form>
    <p> 제목 </p>
    <input type="text" name="input_title">
    <p> 내용 </p>
	<input type="text" name="input_content">
</form>
그럼 이제 form을 던질 곳 목적지를 정해주자
form action="/posts/create">
그리고 나서 routes도 정해주자
get 'posts/create' => 'posts#create
def create
#입력 받은 데이터를 실제 DB에 저장할 액션
	@post = Post.new
    @post.title = params['input_title']
    @post.content = params['input_content']
	redirect_to 'posts/new'
end
-
@post = Post.new는 무엇이냐? Post는 모델 이름. 그 모델에서 새로 하나를 만들고 @post에 담아주겠다는 것이다. 그렇다면 왜 @post.title이고 @post.content냐? 하면, 모델을 생성할 때 그렇게 만들어 주었기 때문이다. (동영상 강의에서는 rails g model Post만 해주었고, db/migrate/create_posts.rb에 들어가서 직접 t.string : title과 t.text :content를 추가해줬었다. 그렇게 모델을 생성해도 된다.)
-
그럼 왜 params를 쓰냐 ? puts params를 해보면 input title
{"input_title=>"", "input_content"=>"","controller=>"posts","action"=>"create"}이렇게 뜬다. controller와 action은 우리가 지정해준거니까 뜨는거다. 이제 “” 이 안에 값을 받아서 넣어주기만 하면 된다. 해쉬에서 키가 input_title이고 input_content이니까. (이건 내가 쓴거 애매해: 그걸 그대로 값을 불러와주는 방식으로 사용하면 된다.) 그래서 params[‘input_title’], params[‘input_content’] 또한 루비의 특성상 params[:input_title], params[:input_content]이런 식으로 작성해줘도 된다. 이렇게 하면 성능이 더 좋다. -
redirect_to 'posts/new'는 무엇이냐? 다시 ‘posts/new’로 돌아가라는 것이다. 즉 create안에서 정의된 액션들 실행해주고 나서 거기에 그대로 있을 순 없으니 다시 ‘posts/new 화면으로 돌아가라는 것이다.
##Read
def index
모든 post들을 보여주는 view
	@posts = Post.all
end

def show
# 한 개의 post를 보여주는 view
	@post = Post.find(params[:post_id])
end
키 값을 find 넣어줘서 사용한다. ` get ‘/posts/show/:post_id’ => ‘posts#show’ ` 이렇게 액션을 주게되면 id값이 url로 들어간다. ` @post= Post.find(params[:post_id]) ` find는 아이디 값을 받아온다
create도 수정해주자
redirect_to “/posts/show/#{@post.id}”`
##Delete
get '/posts/destroy:post_id' => 'posts#destroy'
delete
    @post = Post.find(params[:post_id])
    @post.destroy
end
show.index.html에는 어떻게 써줘서 지우는걸 표시하냐? ` <h3><a href=”/posts/destroy/<%= @post.id %>” data-confirm=”진짜로 삭제하시겠어요?”</h3>`
##Update
get '/posts/edit/:post_id' => 'posts#edit'

get '/posts/update/:post_id' => 'posts#update'
def edit
#사용자가 데이터를 입력할 화면
	@post = Post.find(params[:post_id])
end

def update
#입력받은 데이터를 실제 DB에 저장할 액션
	@post = Post.find(params[:post_id])
    #수정할 코드
    @post.title = params[:input_title]
    @post.content = params[:input_content]
    @post.save
    redircet_to "/posts/show/#{@post.id}"
end
그리고 나서 실제 보이는 화면으로 간다.
show로 가서 수정하기를 넣어주고
edit에는 form tag안에 value = "<%= @post.title>%>"
value = "<%= @post.content>%>"를 넣어준다.
참고자료
http://guides.rorlab.org/form_helpers.html resource를 왜 쓰는거야 ? view helper를 왜 쓰는거야? 저걸 보면 이해할 수 있습니다.